Menu plugin
The menu plugin is the main way you and your visitors will navigate the site. It needs to be simple, easy to follow, and get users to their desired contents quickly.
Display mode
Our menu plugin is fairly simple, and is fully flexible. You create each individual menu item, and the template controls how it looks and works. Each menu item is displayed in a list, with each list item capable of having child items, or drop downs in horizontal menus.
The menu at the top of this page, within the blue bar, is an example of the menu plugin at work.
emo:
Vertical & Horizontal
The orientation of the menu is decided by the Template of the page, and can further depend on the Browser size or the Menus location within the page.
The horizontal menu above switches to vertical in responsive mode.
Edit mode
There are two sections to editing the menu. The first is the options section, which currently only allows you to add a title. This feature is best used for side menu's in which items are stacked vertically and a title without a link is required.
The second, and main part of the editing options here are the actual menu items themselves.

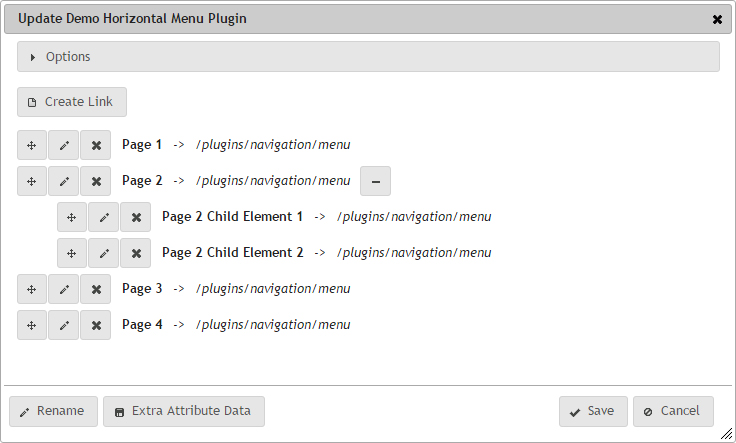
You'll see under the Options section, there is a button called Create Link. This will bring up a dialog with options to add a new menu item. The options you get are the same as with editing and we go into more details below. Creating a new Menu Item puts the latest at the bottom of the list.
The list of menu items appear below the Create Link button, and by default, starts with a Home button, which links to the default landing page.
The list appears vertically, and each menu item contains 5 parts, 3 of those are option buttons which appear on the left hand side. These are similar to a lot of our plugins in which items are editable and moveable.

1 - Move Button
The first button allows you to grab hold of that menu item and drag it above or below other menu items to change the display order. You'll notice the yellow box indicating it's new position much like when moving a plugin around a page.
If you drag the menu item to the right, you'll notice that it indents a little, this makes the menu item a child element of the menu item directly above it. This would create a drop down menu for a horizontal menu. Drag it back left again to move it out again.
2 - Edit Button
Clicking on this brings up the edit menu items, prepopulated with the previously saved data.
3 - Delete Button
This deletes the menu item and removes it from the display.
4 - Item label
This is the text that will appear in the link and be visible to the visitor.
5 - URL
The path to the page that will load once the user clicks on the link.
6 - Expand Button
The expand button will appear on the right of a menu item if it has Child Menu Elements. Toggling this button will hide or display the child elements, making larger menus easier to see and manage.
Editing a Menu Item
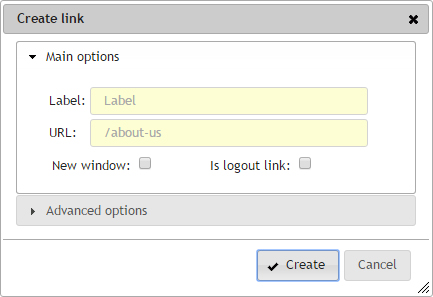
There are two required elements to a menu item, the Label and URL. The others are optional, and can be left in their default state.
Main Options

The label is the text of the menu item that users see, the descriptive, human readable part. Keep it short and descriptive. Your template might limit the amount of characters you have use here.
The URL is the page, image or file you want to link to. If we wanted to link to the home page, we would place a / in the text area, if we wanted it to go the contact page we had created, then we would put /contact-us into the text area. If you want to link to an image or a file, you'll need to enter the path of that file into the text area. Read our File Manager Documentation about getting file paths.
If you want to link to an external site, you'll need to enter in the full path. For example, if we wanted to link to the CMS page on our main BarkWeb site, we would have to enter http://www.barkweb.co.uk/cms
If you enter a URL, the CMS will look to see if a page exists, and if it doesn't it'll prompt you to create a page there an then. For more information about creating pages, please read the Page Creation Documentation. If you want to create the page later, or you are linking to a file, image or another site, you can click cancel, the Menu Item will still be created.
The final options are two check boxes. The New window option, if checked, opens up the link in a new tab or window. Normally, this option is used when linking to documents, or external links.
The last option is Is logout Link. This allows you to make the menu item log the user out. Normally, this is used on ecommerce sites, which allow customers to log in and view their orders, or sites that have members areas. Ticking this automatically files in the URL with the required path, which would log the visitor out when clicking on it.
Advanced Options

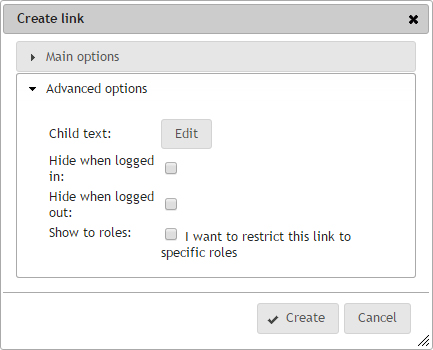
Child Text option allows you to display text and images, much like the Text Plugin, when hovering over the menu item. Your template must allow for this, otherwise it will have no effect.
Hide when logged in, and Hide when logged out, allow you to change the view your users get depending on if they have logged in or not. For example, you might have a Members Page which only people with User Accounts can view, and you might want a link to that page in the Menu, but you only want people who have logged in to see it, so tick Hide when logged out, and it wont display to basic visit.
Restrict to roles will take the previous step a bit further, allowing you to display menu items depending on the type of user logged in. So If you have an Admin User, a Customer and a Supplier, and they all have separate pages, you can have 3 menu items, all with the 'Members Page' label, but linking to different pages, and ticking the equivalent Role so the users only see the Members Page link related to their user account.
Once you are happy with the changes, click save to update the plugin.
