
Image Editor
The BarkWeb File Manger has in inbuilt image editor. Sometimes, you upload an image, and it needs a bit or work. Our simple image editor will provide you with some basic image editing tools.
Edit before uploading
Editing images within the browser is hard work, and our Image editor is very basic, so we recommend that you only use this if your changes are simple and needed quickly, otherwise we recommend using Photoshop, or a similar product.
If you don't have access to anything like this, or your computer knowledge doesn't reach that far, then get in touch and we'll see what we can do.
To start the Image Editor, firstly, you need to find the image you would like to edit via the File Manager and select the Image Editor icon next to the file you wish to edit, which is third icon along.
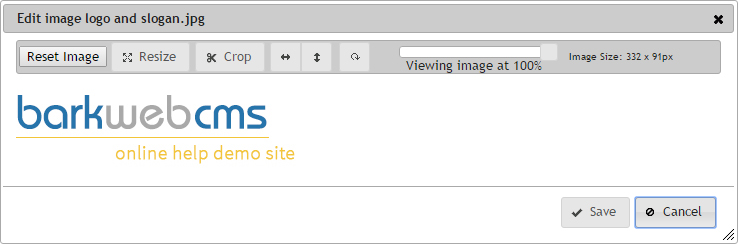
Once loaded, you'll notice a toolbar of options at the top, with the image loaded just below, and the normal save and cancel buttons at the bottom. If your image is a little larger than your screen size, then the image will be zoomed out enough for it to fit entirely in your viewing area.
Reset Image
This is your first restore option. This will remove all changes you've made to this image in this session, and revert it back to when you first loaded it for editing.
You second restore option, is to just cancel the image editing all together, and just load it up again.
Resize
Clicking resize toggles the button and brings up a second toolbar of further options, putting you in edit mode and allowing you to change the size of the image.

Width will be populated with the current width of the image in pixels, allowing you to change this number to the width you would prefer. The Height will also be pre populated with the image height, and changing this changes the height of the image.
You will notice changing either the height or the width may alter the other if Keep Aspect Ratio is ticked.
Keep Aspect Ratio stops the image getting distorted, and automatically alter either the Width or the Height if the other is changed to keep the aspect ratio the same. The best way I can describe the aspect ratio, is that if your image is a square of 50 pixels wide, by 50 pixels high, and you want to change the width to 25 pixels, KAR would also change the height to 25 so that your image remained a square, otherwise it would be changed into a rectangle, distorting your image.
Once you are happy with your resizing, you must click Commit Resize to commit the changes, before you can either perform further changes, or save the image.
If you would like to cancel the resize, click the cross icon at the end to cancel the resize and it will revert back to the previous size. Both buttons will remove the toolbar.
Crop
Clicking crop will toggle the Crop toolbar, and place a crop box around the image. The toolbar is for manually selecting the crop area, while the crop box around the image allow you to drag and resize the box until it covers the area that you wish to crop.

The manual entry start from the top left position (Position X and Y), to the bottom right position (Position X + width, and Position Y + height.
You cannot crop bigger than the image, so the crop box will always be restricted and bounded by this.
Keep Aspect Ratio does the same as in Resize, so that the image keeps the same shape.
Once you are happy with your crop area, you must click Commit Crop to commit the changes, before you can either perform further changes, or save the image.
If you would like to cancel the crop, click the cross icon at the end to cancel the crop and it will remove the crop area. Both buttons will remove the toolbar.
Flip horizontally & vertically
Two buttons that do exactly what they say. You can reverse and changes by clicking the same button again.
Rotate right
Rotates the image 90 degrees to the right. Keep clicking to rotate, 180 degrees etc.
View slider
Allows you to zoom out of an image. Useful for dealing with large images. By default, this will be set at 100%. If the image you are editing is too large for the screen, it will automatically be zoomed out to fit within the viewing area. The View slider will then reflect the percentage of size difference from the original. Slide this left and right to zoom in and out.
You cannot enlarge this image and zoom in this way.
Image dimensions
Small label on the right details, in pixels, the size of the image you are working with.
Saving or cancelling
Once you are happy with the image, click save. You will be prompted for a file name, and the original file name will be preselected. You cannot change the file type.
If you keep the same file name, then a copy of the previous image version is saved with a timestamp added to the end of the file name, and the new image takes its place.
If you choose to enter in a new file name, then the original file will be left untouched.
If you would like to cancel you changes, click cancel.
01323 735800