Getting to know the Text Editor
A large part of the CMS uses the Text Editor. From the Blog and Product entry to the simple Text Plugin. The same text editor is used throughout the site, the only thing that will change will be the availability of some features.
Demo
Toolbar Buttons
Source Button
The source button is probably best left to people who have an understanding of HTML and CSS. This is probably the only advanced feature in the Text Editor, but is a vital tool for people who edit websites with a little more complexity.
Toggling the Source button switches the display between normal Wysiwyg view, and code view. So you'll see the raw HTML code that the normal view generates for you. The raw code is what is actually used by the web browser to work out how to display each element of your site.

Cut Button
Simply cuts the highlighted text and places it on the clip board.
Copy Button
Copies the highlighted text and places it on the clip board.
Paste Button
Places the last copy to the clip board into the text editor. Image will only work if they have been copied from another website, and we run a filter on all text that strips out text formatting to leave just the basic text.
Paste as Plain Text
This button will provide you with a dialog to paste text into. It will then strip out all formatting, including headers and table layouts and provide you with just plain text.
This button is likely to be removed in a future update.
Paste from Word
This button attempts to paste from a Word Document.
This button is likely to be removed in a future update.
Undo Button
This button undoes the last edit that was made.
Redo Button
This button will put back everything that was removed or added when you clicked on your undo button.
YouTube Button
A very useful feature, which will help you insert a YouTube video directly into your text. We do have a YouTube Plugin, but for things like Products and Blogs, you'll have to use this option.
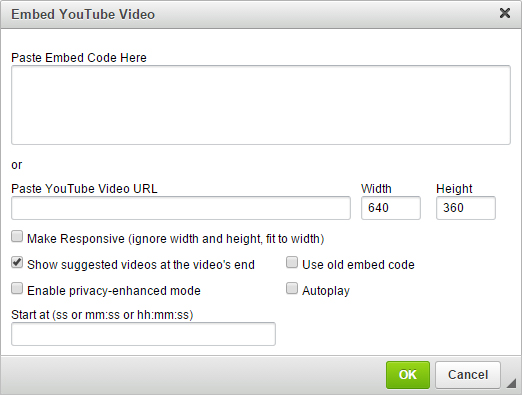
Clicking on this will present you with a dialog, along with some options. The first text box will allow you to place in the embed code copied directly from the YouTube page under the share options.
We suggest using the next option, which requests that you just paste in the URL of the YouTube video. A default width and height are already populated, which you can change if you wish.

For most websites now, we suggest you tick the first tick box which will make your video responsive, and ignore the height and the width and fill its container.
You can then choose whether to display suggested videos at the end of the video, enable privacy-enhanced mode, or auto-play when the page is loaded.
The last option allows you to manually set where to start the video.
Align Buttons
The align buttons position the text to the Left, the Centre, Right or justify it to full up the width.
If for any reason these have no effect on the text, then it'll be because the area of text you are editing is being overridden into a default position by the template. For example. The footer on the far right might be aligned right by default.
Create a link
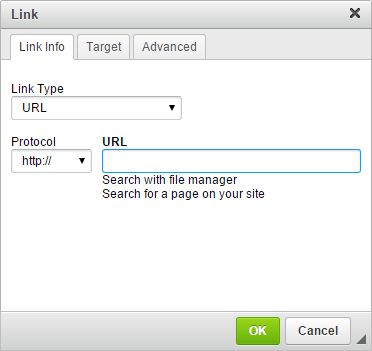
When you want text to link to another page, site or file, you'll need to create a link. To do this, highlight the text that you want to link when clicked on, and select the link button. This will bring up the link dialog.

To view this in more detail, you'll need to head over to the full instructions.
Remove Link
This button will remove any link that is highlighted, or that the cursor currently sits within. See both examples below.

Create Anchor
To create an anchor, which is a place on a certain section on a page in which you can direct uses to via a link, place a cursor at the beginning of the text that the browser is to scroll to, and select the Anchor button. This will present you with a dialog box in which you must enter the name of your anchor. This is what you'll link to from either a link on this page or on other pages.
Insert Image
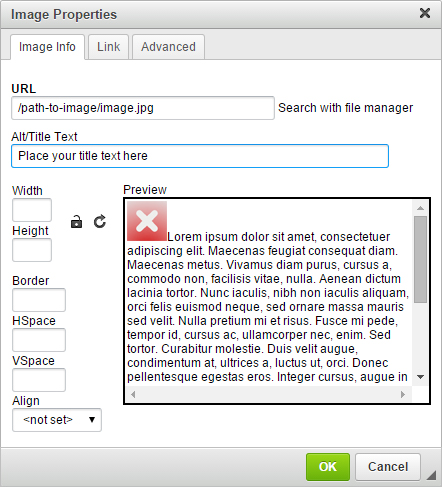
In the simplest form, this provides you with a box in which you can select an image to insert into a text. Alternatively, you may just need our Image Plugin. But if you have to insert an image within the text, this will give you a dialog box in which you can place the URL of the Image or you can select an image or File from the File Manager, then enter the Alt Title and click OK.

View the advanced options documentation.
Insert Table
You can also insert tables into your text. Please remember that tables are for displaying data, and not for positioning images and text, as this will break your responsive template.
The Tables Dialog window gives you basic table options. Insert your Rows and your columns. Set your width, if your not sure what width you want, set to 100% as this will fill the container and will work with your responsive template. Maybe best to leave your height blank so that it stretches with the content.
Headers allows you to set if you have a header row, column or none at all. This will give that row a different style.
Setting your border size will have a different effect depending on your template. Best to stick with the default and alter it until you get your desired effect.
Align allows you to align the table, much like you would with text and images.
Cell spacing is the the space between cells. Cell padding is the space between the cell boundaries and the text.
View the advanced options documentation.
Insert Horizontal Line
Simply inserts a line at the position the cursor currently sits at. Style of the horizontal line will depend on the settings of your template.
Line example:
Helps to split things up nicely between areas of text.
Insert Special Character
Allows you to insert a character or symbol not found on your keyboard, and avoids you having to learn special keyboard shortcuts to get the © symbol.
Maximize
Increases the text editors size to full screen, allowing you to use the full space of your browser to do your work. Just because sometimes the dialog window just isn't big enough.
Bold Button
Toggles the current font style or the highlighted text to Bold.
Italic Button
Toggles the current font style or the highlighted text to italic.
Underline Button
Toggles the current font style or the highlighted text to Underlined.
Strike Through Button
Toggles the current font style or the highlighted text to Strike Through. Strike Through looks like the text has been crossed out.
Subscript Button
Toggles the current font style or the highlighted text to Subscript. A subscript is a number, figure, symbol, or indicator that is smaller than the normal line of type. Subscripts appear at or below the baseline.
Superscript Button
Toggles the current font style or the highlighted text to Superscript. A superscript is a number, figure, symbol, or indicator that is smaller than the normal line of type. Superscripts appear above the baseline.
Remove Format
This removes any formatting currently assigned to the highlighted text. By default, we strip out any formatting on paste. This does the same to anything that currently has formatting that you have since adding. Leaving you with just basic formatted text. So removing colours, sizes, styles etc.
Numbered List
Inserts or removes a numbered list. Similar to bulleted list.
Bulleted List
Inserts or removes a bulleted list. Similar to a numbered list.
Decrease Indent
Decreases the indent to the text if there has been one added.
Increase Indent
Adds an indent to the current section of text. Useful for quotes or lists. Works similar to a bulleted list, but without the graphical points.
Block Quote
Toggles the current section of text to Block Quote text. The display of this will depend greatly on any style that has been added to your template. By default, padding will be added to the section, it'll become slightly indented and the font style will be italic.
Font
This allows you to change the current font style. We strongly recommend that you refrain from using this option as the font style should really be chosen by your template. You run the risk of having different font styles on different pages which can badly affect the look of your site.
Best to change the Paragraph Format instead or select from the Styles list.
Font Size
This allows you to change the font size. Again, same as the Font Style, we strongly recommend that you refrain from using this option as the font size should really be chosen by your template. You run the risk of having different font sizes on different pages which can badly affect the look of your site.
Best to change the Paragraph Format instead or select from the Styles list.
Paragraph Format
This allows you to change the type of text you are inserting into the Text Editor. Each option is a standard HTML formatted type, and the look of each one will be different from what actually appears on your site due to the fact that the Template that your site uses styles everything like this, and can changed depending on page and location.
Best to try out the style, save the plugin and make changes once you've viewed it on your site. The main ones you'll find yourself using will be the Normal Text and Heading options.
Styles
This is a list of custom styles built into your current template. Each site will be different, and these can be customised by BarkWeb. This is handy when you have styles that appear on several pages, like a red highlight text. This way should the style need to be changed in the future, we can change it in the template and it'll update every place the style is used, making things easier to manage and keeping everything looking the same.
If your style list does not appear, then there are no styles for your current template.
If the drop down is blank, then you may need to highlight a certain piece of text, link a link for example, for the style to appear.

