Image plugin
The Image Plugin is useful for when you want to just display an image. A good example of this, is when you want to display a logo on your website in the header. This would be an image plugin.
Display mode
Edit mode
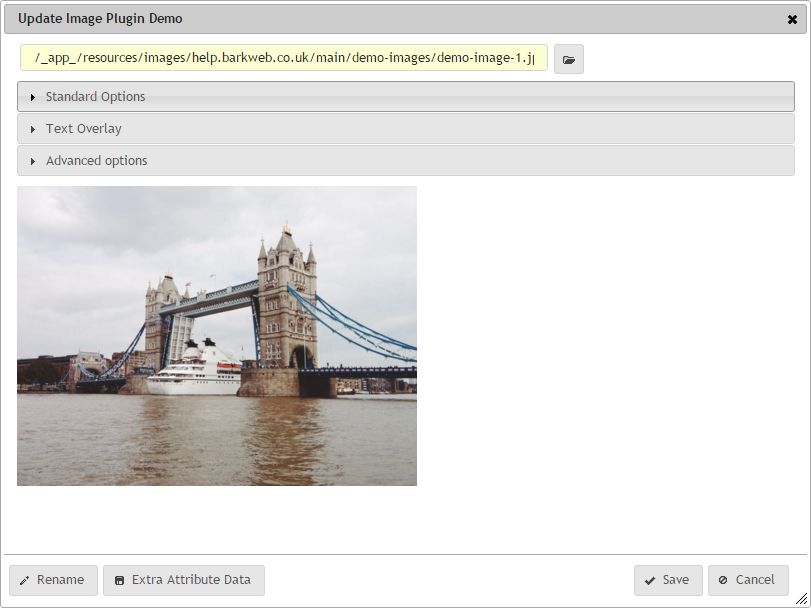
There are a few sections to the edit mode. There is the image itself, then there are extra options, with Standard Options being open by default when you edit the plugin. Followed by Text Overlay, and Advanced Options. At the bottom of these, is a a preview of the image.

Image
The first option is an input field which will contain the location of the image. The easy option is the select the File Manager button to the right, which will allow you to locate an image, and clicking that image will automatically place the path into the input field.
If you wish, you can manually enter in a path to an image, if you have copied the path from elsewhere. For example you can reference an image from an external site, and place the path here. But most of the time, you'll want to select an image from the File Manager.
Standard options
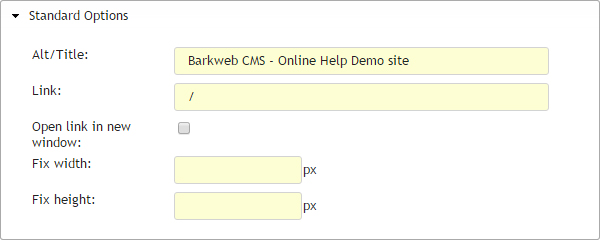
The Standard Options are displayed by default, and this are the options you are most likely to edit.

Alt/Title
You'll place the title or a small description of what the image contains. The Alt part standards for Alternative, because this text is used as an alternative option if, for some reason, the image cannot be loaded or displayed. Search engines use this piece of text to help determine what the image contains and help people find your content.
This field is required for your site to meet website markup criteria, which is basically a standard for website code.
Link
If you would like this image to link to another page, enter path to the link this text field. Again, you can link to a page on your site, or link to an external page.
Open link in a new window
If you use the link facility, ticking this box will open the link in a new tab, instead of within the current window.
The best rule for deciding if you should tick this, is if you are linking to a file, or an external website. Otherwise, if its an internal page, leave it unticked.
Fix width
You can adjust the width of the image by entering a manual width into this field. You may want to do this to slightly increase or decrease the size of the image uploaded.
Fix height
You can adjust the height of the image by entering a manual height into this field. You may want to do this to slightly increase or decrease the size of the image uploaded.
Image size
Only use the fixed image size as an alternative. A better solution would be to resize the image and upload that to the File Manager.
Larger images scaled down to fit will still load the full image, which will be slow and use up more bandwidth.
Text overlay
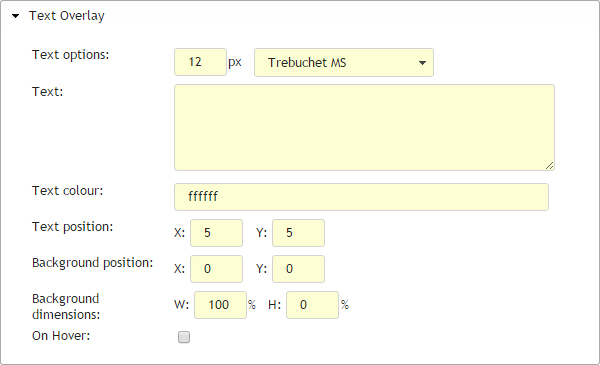
The text overlay option allows you to place text, and a background, over the selected image. The options are basic, but is a better option than placed the text as part of the image, as it allows search engines to read the text.

Text options
Select the size of the overlay text font size, and the Font type itself from a list of standard web fonts.
Text
Enter the text that you wish to appear within the overlay. There is no limit to the amount of text that can appear. You are only limited by the size of the image. Although the more text you have, the more problems you will have when the site goes responsive.
Text color
Colour of the text within the Text Overlay.
Text Position
The position of the text is split into two sections, the X and Y position. This are measured in pixels and start from the top left of the image.
Background Position
The background position is the start point of the grey tinted background of the overlay you can place under the text to make it more readable over some images. This is the top left position of the box, and, like the text, the measurements are in pixels from the top left position of the image.
Background dimensions
Again, split into two sections, width and height. These are in percentages of the image.
On Hover
On hover allows you to add a different text overlay to the image if the user hovers the mouse over the image. Once the tick box is checked, a new accordion will appear with On Hover Options. This contains some of the same options that appear above. The functionality remain the same, but they appear on hover instead. These options are Text, Text position, background position and Background dimensions.
Advanced options
These advanced cover some extra options for the image on this page.

Show when
By default, the image displays all the time, which is why Always is selected. There are two options available. If Logged In is selected, the the image only appears if the user is logged in. This means logged with any profile. Logged out means that the image only shows if the user is logged out.
Use meta tags
Meta tags add extra code behind the scenes to your page, indicating that this image is important. Facebook, Twitter and other sites, when sharing links to your page, sometimes include a thumbnail, which is usually the first image, or most prominent image on your page. Adding these meta tags, your are telling these sites which image to use above all others.
When these sites look for images, they don't always find the correct one, which is why this option allows you to point them in the right direction.

